
Now a post about constructing a garden office might seem rather off topic in a quant trading/investing blog. But, (i) there has been a fair bit of interest in my occasional twitter posts in this vein, and (ii) the subject of where you work from as a self employed trader strikes me as quite relevant. Plenty of youtube trading gurus post endlessly about fitting out their trading offices (albeit these are mainly of the multiple monitor type, not the boring black box in the corner of the room variety). Finally it strikes me that there is a big venn diagram nerd overlap consisting of people who are interested in making stuff in both virtual form (code) and physical form (with screwdrivers).
Of course if you find this post terribly uninteresting, feel free to come back in a few weeks when I'll be posting about my new book.
The brief
For the last 6 years or so I've worked mostly out of a small study in our house. For various reasons which I won't go into here this has become more difficult recently. In the past I've toyed with renting desk space in a local shared office space (nothing fancy like 'WeWork', I live in a dull commuter town), but I can't really justify the cost. Also shared office spaces are either full of annoying young fintechy/crypto/startup people or earnestly dull blokes in suits who work in teaching recruitment.
So I need somewhere to work. Bear in mind that work for me usually involves staring into space and occasionally writing or typing something. So space isn't necessary but a nice view is. I don't need 40 monitors. I won't be moving my trading infrastructure in, which consists of a few headless servers. All I need is a desk, a bookcase, some power, internet and phone.
When I floated this idea the younger members of the family got very excited. The idea of a 'chill out' room at the bottom of the garden was very appealing. I toyed with building a two room structure, with a small office for me seperated from the kids area, but it's unlikely I'd be able to work with them next door so the brief was for a single room with enough space for both office and "playroom".
External constraints
The site I'd chosen for the cabin was done towards the bottom of our garden; roughly 120 feet from the house. This was far enough away that the cabin was pretty invisible from the house as it's screened by trees and I was planning to paint it dark green. The site was hemmed in by a fence, fruit trees and some play equipment. The other issue is that our garden slopes downwards here and when there is rainfall it can get pretty soggy.
 |
| Pretty soggy |
There are various laws about planning permission for garden buildings in the UK. The key ones for me were:
- The building is to be placed less than 2.0m from the boundary of the property with a maximum overall height of no more than 2.5m from existing ground level (really I needed to get closer than 2m to the boundary or I wouldn't have enough space to play with).
- The building is not to be used as self-contained living accommodation or have an antenna (so chill out zone rather than spare bedroom. And no HFT style microwave antenna).
- Outbuildings should not be closer to a road or public highway than the original house itself (behind the house so no problem).
Also:
- If larger than 15 square metres it's likely to have to meet building regulations
Here is the site before work started.
 |
| Notice the kids slide and fence, plus a pear tree that is smack in the middle of the site (it's days are numbered!) |
Choosing the cabin
After a lot of googling I decided to buy a 'log cabin'. I considered the cheaper option of a glammed up shed, and also the more expensive options (basically small buildings with fancy bifold doors). Also a factor was the fact that my DIY skills are somewhat limited, and constructing something completely from scratch was probably beyond me; log cabins are relatively simple to assemble- you literally hammer together interlocking "logs". At least the internet said they were simple to assemble, and to be fair I managed the construction relatively easily.
More googling suggested that a good company to go for was Tuin; amongst other things the sheer volume of honest information on their blog was a big plus for me. I decided to opt for the Lory cabin for a variety of reasons:
- A good sized well proportioned space which comes in just under the 15 metre squared limit
- I liked the contemporary look of the building
- Also liked the overhang which meant I could have a veranda to sit on in the rain (it rains a lot in England)
- 45mm seemed a good compromise for wall thickness
- Large windows so nice and light (all the trees around the cabin meant it could be a bit dark in winter)
- 2.24 metres high, giving me 26cm of clearance below the 2.5m limit. This allowed me to raise the building off the ground to reduce issues with flooding, and allow for the slope and tree roots.

Building the base
A big shout out to this series of youtube videos which I found very helpful, especially when designing and building the base, flooring and roofing.
From the ground up the base of the building is basically:
- Hardcore backfilled into a hold in the ground, supporting:
- Concrete slabs (I got most of these from ebay), on top of which was:
- Damp proof membrane, on top of which was:
- Adjustable pads, bought from Tuin. These supported:
- 2x4 tanalised timber beams. Around the perimeter of the cabin these were doubled up. On top of these were:
- Composite foundation beams. These then supported the actual log cabin.

I designed the base so that there was a maximum 1 metre span between supporting pads around the perimeter of the cabin (all the weight of a cabin sits on the perimeter). The perimeter was double thickness 2x4, so 4x4 timber. There is also a supported double thickness beam running down the middle of the cabin, so the maximum joist span was less than 2 metres. The decking area at the front (bottom of the diagram) is basically a 'mini-me' version of the main frame. This is probably over-engineered but it made the construction of the frame neater and more symmetric.

At this point I did make a mistake because I forgot that the floorboards will run across the joists not along them (the joists are the left to right timbers inside the perimeter of the cabin; because the entrance door is at the bottom of this drawing the floorboards would normally run left to right. Basically the left to right timbers should really be running down so they are at 90 degrees to the left to right floorboards). However as you shall see later this was easily rectified.
First step was to lay out a square perimeter on the ground and then mark out the area of the cabin, plus where the pads would be. There was a fair bit of a slope which made things tricky. I chopped down the pear tree, but I didn't have to dig the root out as this would sit below the raised floor of the cabin (it's still there!).
Then I removed a layer of grass and a couple of inches of topsoil. I then dug out the holes for the slabs. At this stage I found that one of the pads was going to be in the thick of some tree roots (for a plum tree, not the removed pear tree), so I moved it across, as well as it's 'mirror image' pad on the other side, plus the two intermediates keeping everything symmetric:

Fortunately the over-engineered frame meant I could do this without any risk.
Next I put in the hardcore, compressed it, added some sharp sand to make it easier to level the slabs, and then put the slabs in. The slabs have to be level, but the adjustable pads meant I didn't have to perfectly level them with each other (as long as the level difference was never greater than the adjustable range on the pads: in practice this meant there was a fair bit of difference in the level of the slabs across the plan). I cemented around the slabs to stop them shifting.
I then laid a DPM (damp proof membrane) over the slabs before positioning the pads. The DPM prevents moisture wicking up the pads into the timber frame and thence to the cabin itself.
At this point I ended up making a disposable wood frame the same size of the final frame to line up the pads in their final positions (I couldn't use the real frame as that would be too heavy and I could only assemble it in situ, once the pads are in place). In retrospect I wish I'd done that earlier, as it would have helped get the slabs in a more precise position without a lot of faffing around. Now I could level up all the pads (top tip: start with the highest point, which should have a pad with the minimum height, and then level everything else relative to that).
I could now start constructing the real timber base frame in situ on top of the pads. I did this in sections; firstly the left hand side of the main building footprint, then the right hand side, and finally the decking. Everything was held together with a combination of big assed nails and decking screws (screws to get everything in place, then nails to actually support the horizontal loads), plus bolts on the doubled up sections. I didn't bother using joist hangars, since I could attach the joists to the inner parts of the frame before adding the outer ring of timber.
Top tip: a project like this is a lot easier if you have the right tools. I bought an impact driver and a mitre saw to make building the base easier (decided a nail gun was going a bit far). Also new tools are ... cool.
Top tip #2: get loads of screwdriver bits of the appropriate size/type you are using (in my case T25 for deck screws, plus various sizes of PZ). You are guaranteed to drop and lose at least one bit every 5 minutes.
Top tip#3: if like me you are rubbish at hammering in nails, try pre-drilling a pilot hole.
Finally I treated the frame with a couple of layers of creocoat.
Last thing was to add a damp proof course (DPC) on top of the timber where the cabin footprint sat to provide further protection against moisture. I also inserted four plastic conduits for cabling requirements:
The cabin arrives in one massive package which was left in my front garden. I then needed to move this piece by piece to the site. Apart from the windows and doors which required two strong people, everything else was light enough to move single-handed.
It was also relatively easy to identify all the various parts, but I had a few mystery bits of wood which I was able to name when it came to use them.
The actual construction of the cabin was relatively quick. First of all you have to put down the foundation beams and make sure they are square and level. My base was level, but a few mm out from square; however since the 4" wide outer timber was considerably wider than the foundation beam this gave me a bit of tolerance in positioning the beams.
Then it's just a matter of locking the timber logs together with the help of a big mallet. I got from ground to roof level in a single day (single-handed remember - I just needed help moving the window and doors into place). The roof joists took a bit longer to hammer into place as they were really tight. The really fiddly bit, for which I wish I had help, was putting in the fascia boards that go round the perimeter of the roof. I also wish I had read the Tuin blog more carefully, or I would have found out earlier that it is easier to pre-assemble the fascia boards before installing them.
One change I did make to the design of the building was that there was a small gap between the edge of the roof boards and the fascia, 'for drainage'. I thought this looked a bit pants especially if like me you struggled to line up the roof boards precisely, plus I was planning to put guttering on the roof anyway, so I concealed these holes with a bit of timber.

You can order the cabin pre-painted or pre-treated, or you can paint it yourself. If you use the recommended 3 coats of Tuin carefree protectant then there isn't much saving cost-wise from painting it yourself. I decided to paint it myself mainly because the pre-treatment adds 2-3 months to the lead time for the cabin, and I wanted to complete the project by the end of September. I ordered far too much of the protectant, but at least I will have plenty for future maintenance purposes. I bought the dark green for the exterior, and a clear protectant for the interior.
Note: They recommend that you remove the windows and door frames before painting, otherwise when the log timbers expand in cold/wet weather there will be unpainted timber revealed. If you then paint this you don't get colour matching. This did in fact happen:
However as you see there is only a tiny amount of movement, less than half an inch. I just touched this up with a little bit of paint and it's invisible. This is a testament to the quality of the protectant I used.
The roofboards of the cabin are nice to look at but are (a) not weatherproof and (b) not insulated. Since heat rises roof insulation is a good thing to have. I used a celotex type PIR insulation board which I placed in a timber frame covered in OSB sheets. I decided not to insulate the entire roof, only over the cabin itself, and not the side or front overhangs. This also created a natural dish gutter around the perimeter of the cabin roof. To make things weather proof I decided to use the easy roof product from Tuin.

The cabin roof slopes backwards at a pretty decent pitch so you end up with all the water at the back of the roof. You can just leave a gap in the roof, but it's obviously much better to add some guttering so that's what I did. On the Tuin blog they talk about cutting into the roof joists so that the guttering sits nicely, but my DIY skills turned out to be insufficient for the job. Fortunately because of the insulation the guttering could sit on top of the joists and still marry up to the roof level.
I bought the floor pack from Tuin, which came with joists and skirting. Normally you wouldn't need the joists with a timber base which already has it's own joists. But remember from earlier that I'd screwed up the orientation of the joists. So I decided to lay more joists on top of the original base, at 90 degrees. This meant I could lay the floorboards correctly; running from left to right as you enter the cabin through the front door. I did lose 50mm in interior height, but this was no big deal.
The full spec of the floor, from pad level upwards:

I decided to score the PIR rather than sawing it which generates a lot of toxic dust, but this meant it often wasn't accurately sized. Some expanding foam dealt with the gaps. The second DPM is probably overkill, but I had masses of the stuff so I thought I might as well use it. Notice from the highly accurate schematic drawing that the flooring is not joined to the cabin and has a small expansion gap, and the skirting is joined to the cabin wall but not the floor. I doubled up the skirting provided by Tuin as it meant I could have a wider expansion gap and not have to be so accurate with my floorboards.
I left a gap in the insulation and DPM for my cable conduits, and then put expanding foam around them. I could also have drilled holes in the floorboards for the conduits, but decided to cut some floorboards short instead and leave a gap in the floor. I planned to put my solar panel stuff here inside a cabinet, so the floor wouldn't be exposed anyway.
Because it was ~120 feet to the cabin from the house laying a power cable would have been an expensive and time consuming business. So I decided to install a solar panel system, which I got from select solar, and which was actually cheaper than the cost of the cable would have been (plus free electricity and save the planet guvnor). Although the number of trees means that the solar panels will rarely be at 100% efficiency I only need to run a laptop (which can also run down it's own battery if needed) plus maybe a light or two.
The panel goes on the roof (duh). Originally the panel was sloped and rotated with the sun (fancy), but the extra height it created breached planning. It's now virtually flat on the roof (~5 degree slope), and is fixed so it doesn't change angle, but I've not had any noticeable drop in solar yield (at such a flat angle the direction becomes less important).
Inside there is a charge controller, battery (which weighs a ton) and inverter into which you can just plug in a standard UK plug. Wiring it all up is pretty straightforward, and the charge controller can be monitored via bluetooth on your phone which is rather cool.
I left a spare conduit in case I decide to add mains power later; and indeed a plan B option if I need more power temporarily is to run a caravan style cable from the house's external power sockets down to the cabin.
For the 'office' side of the cabin I wanted to keep things minimal: book shelving, a desk, and a chair. I could have just bought shelves and a desk, but I had so much spare wood left over I decided to use some of it. The shelves are made of leftover floor and roof boards, and also include a cabinet which houses the solar panel system as well as hiding the conduits and wiring.
I wanted to have a corner desk that would allow me to sit where the two corner windows meet, but I also wanted to move this out of the way when not being used so it didn't block the view. After much deliberation I decided to build a gate leg desk on castors.
The legs of the desk are made from a spare log, and the desk top is a hardwood plywood / OSB sandwich which I decided to leave unpainted since the ply is quite a nice colour.
On the non office side there is a sofa, and beanbag. I also have a whiteboard and flipchart, since I'm a big fan of thinking whilst doodling.
I ran an armoured CAT6 and separate phone cable down to the cabin. For now I decided not to bother burying them, so they just run along the fence mostly hidden by vegetation.
At the cabin end I installed a two port RJ45 outlet. This was neater and easier than having a port for the phone and another for the CAT6. I sourced some RJ45 to phone lead cables so I could just plug my phone into the RJ45 socket.
Getting the cables into the house was tricky and I had to get some help to lift some patio slabs, before running the cable down and then into the wall. Again I used a two port outlet, and connected the CAT6 to my router, and the phone cable into the phone socket using another CAT6->RJ45 cable.

Fortunately the over-engineered frame meant I could do this without any risk.
 |
| Holes have just been dug. Slabs shown aren't in final position yet, these are just to check hole size. |
 |
| Slabs for cabin footprint are in place, three decking slabs still have to added |
At this point I ended up making a disposable wood frame the same size of the final frame to line up the pads in their final positions (I couldn't use the real frame as that would be too heavy and I could only assemble it in situ, once the pads are in place). In retrospect I wish I'd done that earlier, as it would have helped get the slabs in a more precise position without a lot of faffing around. Now I could level up all the pads (top tip: start with the highest point, which should have a pad with the minimum height, and then level everything else relative to that).
 |
| Wooden frame sitting on pads, with DPM underneath the cabin footprint. |
I could now start constructing the real timber base frame in situ on top of the pads. I did this in sections; firstly the left hand side of the main building footprint, then the right hand side, and finally the decking. Everything was held together with a combination of big assed nails and decking screws (screws to get everything in place, then nails to actually support the horizontal loads), plus bolts on the doubled up sections. I didn't bother using joist hangars, since I could attach the joists to the inner parts of the frame before adding the outer ring of timber.
Top tip: a project like this is a lot easier if you have the right tools. I bought an impact driver and a mitre saw to make building the base easier (decided a nail gun was going a bit far). Also new tools are ... cool.
Top tip #2: get loads of screwdriver bits of the appropriate size/type you are using (in my case T25 for deck screws, plus various sizes of PZ). You are guaranteed to drop and lose at least one bit every 5 minutes.
Top tip#3: if like me you are rubbish at hammering in nails, try pre-drilling a pilot hole.
 |
| Most of the frame in place here. A few noggins have been inserted; these go between the joists to stop them twisting. |
Finally I treated the frame with a couple of layers of creocoat.
 |
| Finished and treated frame. The loose untreated timber is not part of the frame, but is being used to double check the cabin footprint |
 |
| The three front pads which support the edge of the deck do not have any DPM between them and the slab, as the DPM only needs to be under the cabin footprint. Instead I used a section of DPC between the slab and the pads. |
Last thing was to add a damp proof course (DPC) on top of the timber where the cabin footprint sat to provide further protection against moisture. I also inserted four plastic conduits for cabling requirements:
- Solar power
- Mains power (future possibility)
- Phone cable
- CAT6
 |
| Plastic conduits. DPC is just visible in the top left of the picture. |
Constructing the cabin
The cabin arrives in one massive package which was left in my front garden. I then needed to move this piece by piece to the site. Apart from the windows and doors which required two strong people, everything else was light enough to move single-handed.
 |
| Look at my massive package |
 |
| Unpacked and neatly stacked |
The actual construction of the cabin was relatively quick. First of all you have to put down the foundation beams and make sure they are square and level. My base was level, but a few mm out from square; however since the 4" wide outer timber was considerably wider than the foundation beam this gave me a bit of tolerance in positioning the beams.
Then it's just a matter of locking the timber logs together with the help of a big mallet. I got from ground to roof level in a single day (single-handed remember - I just needed help moving the window and doors into place). The roof joists took a bit longer to hammer into place as they were really tight. The really fiddly bit, for which I wish I had help, was putting in the fascia boards that go round the perimeter of the roof. I also wish I had read the Tuin blog more carefully, or I would have found out earlier that it is easier to pre-assemble the fascia boards before installing them.
 |
| Fully built cabin. |
One change I did make to the design of the building was that there was a small gap between the edge of the roof boards and the fascia, 'for drainage'. I thought this looked a bit pants especially if like me you struggled to line up the roof boards precisely, plus I was planning to put guttering on the roof anyway, so I concealed these holes with a bit of timber.

Painting
You can order the cabin pre-painted or pre-treated, or you can paint it yourself. If you use the recommended 3 coats of Tuin carefree protectant then there isn't much saving cost-wise from painting it yourself. I decided to paint it myself mainly because the pre-treatment adds 2-3 months to the lead time for the cabin, and I wanted to complete the project by the end of September. I ordered far too much of the protectant, but at least I will have plenty for future maintenance purposes. I bought the dark green for the exterior, and a clear protectant for the interior.
 |
| Two coats into the painting one more coat to go |
Note: They recommend that you remove the windows and door frames before painting, otherwise when the log timbers expand in cold/wet weather there will be unpainted timber revealed. If you then paint this you don't get colour matching. This did in fact happen:
 |
| Photo taken in January, a few months after construction was completed |
However as you see there is only a tiny amount of movement, less than half an inch. I just touched this up with a little bit of paint and it's invisible. This is a testament to the quality of the protectant I used.
Roofing
The roofboards of the cabin are nice to look at but are (a) not weatherproof and (b) not insulated. Since heat rises roof insulation is a good thing to have. I used a celotex type PIR insulation board which I placed in a timber frame covered in OSB sheets. I decided not to insulate the entire roof, only over the cabin itself, and not the side or front overhangs. This also created a natural dish gutter around the perimeter of the cabin roof. To make things weather proof I decided to use the easy roof product from Tuin.

Initially I found the easyroof anything but easy. It comes in 1 metre wide rolls which you unroll and then stick to the roof in overlapping sections. I kept getting it stuck to itself until I eventually worked out a systematic way to unroll it gradually whilst sticking it down. Fortunately it's easy to correct any bodged mistakes by just putting more easyroof on top.
(Another shout out to this series of youtube videos which helped me with the roof insulation)
For the edge of the roof I ordered and fitted some of these metal trims, however in retrospect they were a bit of a faff and not really neccessary; I think it would have been neater and easier to create timber upstands.
 |
| Dished roof creating "guttering" down side of roof. You can see how I've used multiple layers of easy roof to deal with the akward corners. The aluminium trims are also visible. |
(Another shout out to this series of youtube videos which helped me with the roof insulation)
For the edge of the roof I ordered and fitted some of these metal trims, however in retrospect they were a bit of a faff and not really neccessary; I think it would have been neater and easier to create timber upstands.
Plumbing
The cabin roof slopes backwards at a pretty decent pitch so you end up with all the water at the back of the roof. You can just leave a gap in the roof, but it's obviously much better to add some guttering so that's what I did. On the Tuin blog they talk about cutting into the roof joists so that the guttering sits nicely, but my DIY skills turned out to be insufficient for the job. Fortunately because of the insulation the guttering could sit on top of the joists and still marry up to the roof level.
 |
| Yes, I know I need to clear the leaves |
The guttering is connected to two downpipes. One runs diagonally across the back of the cabin, and the other straight down also feeding a water butt:


The overflow pipe then runs down the side of the cabin.
Subsequent to the original build, I found it difficult to create a slope on the guttering towards the original downpipe, and still get decent drainage off the roof. There was a lot of water pooling in one corner of the roof, and I actually had a little bit of leaking through the roof. To solve this I added the second downpipe discussed above and also caulked the roof planks inside where there were some small gaps. Since then it's been dry as a bone.
I also had some issues with drainage around the building (although given the tendenency of the garden to flood, it was hard to know if these were worse than before). Hence the small trench that surrounds the back and side of the building.
Flooring
I bought the floor pack from Tuin, which came with joists and skirting. Normally you wouldn't need the joists with a timber base which already has it's own joists. But remember from earlier that I'd screwed up the orientation of the joists. So I decided to lay more joists on top of the original base, at 90 degrees. This meant I could lay the floorboards correctly; running from left to right as you enter the cabin through the front door. I did lose 50mm in interior height, but this was no big deal.
The full spec of the floor, from pad level upwards:
- Adjustable pads, bought from Tuin.
- 2x4 tanalised timber beams forming the base perimeter and joists (left to right if you're facing the cabin).
- Inside the cabin these were infilled with celotex type PIR insulation, held in place with little plastic wedges.
- Cabin perimeter: Composite foundation beams. These then supported the actual log cabin.
- Over the joists inside the cabin: Insulation tape
- Inside the cabin: DPM (this is in addition the DPM underneath the base)
- Inside the cabin: Floor joists, going at right angles to the base joists (top to bottom if you're facing the cabin), secured with decking screws to the base.
- Stuffed between floor joists: lambs wool insulation of the type that the sort of people who order organic meat box deliveries end up with loads of
- Inside the cabin: Flooring (at right angles to the floor joists)
- Attached to the cabin walls, inside the cabin: skirting

I decided to score the PIR rather than sawing it which generates a lot of toxic dust, but this meant it often wasn't accurately sized. Some expanding foam dealt with the gaps. The second DPM is probably overkill, but I had masses of the stuff so I thought I might as well use it. Notice from the highly accurate schematic drawing that the flooring is not joined to the cabin and has a small expansion gap, and the skirting is joined to the cabin wall but not the floor. I doubled up the skirting provided by Tuin as it meant I could have a wider expansion gap and not have to be so accurate with my floorboards.
 |
| With higher floor height the skirting is higher than the window frames, so I had to go round the frames |
 |
| To cover the gap between the metal door sill and the last floorboard I used a horizontal piece of skirting |
I left a gap in the insulation and DPM for my cable conduits, and then put expanding foam around them. I could also have drilled holes in the floorboards for the conduits, but decided to cut some floorboards short instead and leave a gap in the floor. I planned to put my solar panel stuff here inside a cabinet, so the floor wouldn't be exposed anyway.
 |
| Gap in flooring for conduits. Notice lambs wool insulation stuffed in void between floarboards and joists |
The floor was finished off with 3 coats of varnish.
Update: To improve insulation I subsequently added some carpet (made up of random offcoats that I cut to size and just stapled down) and some rugs.
Solar panel system
Because it was ~120 feet to the cabin from the house laying a power cable would have been an expensive and time consuming business. So I decided to install a solar panel system, which I got from select solar, and which was actually cheaper than the cost of the cable would have been (plus free electricity and save the planet guvnor). Although the number of trees means that the solar panels will rarely be at 100% efficiency I only need to run a laptop (which can also run down it's own battery if needed) plus maybe a light or two.
The panel goes on the roof (duh). Originally the panel was sloped and rotated with the sun (fancy), but the extra height it created breached planning. It's now virtually flat on the roof (~5 degree slope), and is fixed so it doesn't change angle, but I've not had any noticeable drop in solar yield (at such a flat angle the direction becomes less important).
Inside there is a charge controller, battery (which weighs a ton) and inverter into which you can just plug in a standard UK plug. Wiring it all up is pretty straightforward, and the charge controller can be monitored via bluetooth on your phone which is rather cool.
 |
| From left to right, charge controller, battery, inverter |
 |
| Inverter sticks out of cabinet so you can insert a standard 3 pin plug. |
I left a spare conduit in case I decide to add mains power later; and indeed a plan B option if I need more power temporarily is to run a caravan style cable from the house's external power sockets down to the cabin.
Furniture
For the 'office' side of the cabin I wanted to keep things minimal: book shelving, a desk, and a chair. I could have just bought shelves and a desk, but I had so much spare wood left over I decided to use some of it. The shelves are made of leftover floor and roof boards, and also include a cabinet which houses the solar panel system as well as hiding the conduits and wiring.
 |
| I have a lot of books, some of which I wrote myself |
I wanted to have a corner desk that would allow me to sit where the two corner windows meet, but I also wanted to move this out of the way when not being used so it didn't block the view. After much deliberation I decided to build a gate leg desk on castors.
 |
| Desk in situ |
 |
| Desk folded away and ready to roll |
The legs of the desk are made from a spare log, and the desk top is a hardwood plywood / OSB sandwich which I decided to leave unpainted since the ply is quite a nice colour.
 | |
|
On the non office side there is a sofa, and beanbag. I also have a whiteboard and flipchart, since I'm a big fan of thinking whilst doodling.
 |
| Dartboard for more fintech vibe. Coffee table made from cable drum that the CAT5 cable came on. Gas heater in the corner. |
Update: I've put my exercise bike in here, complete with custom made laptop stand.
Internet and phone
I ran an armoured CAT6 and separate phone cable down to the cabin. For now I decided not to bother burying them, so they just run along the fence mostly hidden by vegetation.
At the cabin end I installed a two port RJ45 outlet. This was neater and easier than having a port for the phone and another for the CAT6. I sourced some RJ45 to phone lead cables so I could just plug my phone into the RJ45 socket.
Getting the cables into the house was tricky and I had to get some help to lift some patio slabs, before running the cable down and then into the wall. Again I used a two port outlet, and connected the CAT6 to my router, and the phone cable into the phone socket using another CAT6->RJ45 cable.
 |
| I is internet P is phone. Obviously. |
 |
| Cables about as neat as possible |
Finishing touches
 |
| Air vent, also supplied by Tuin |
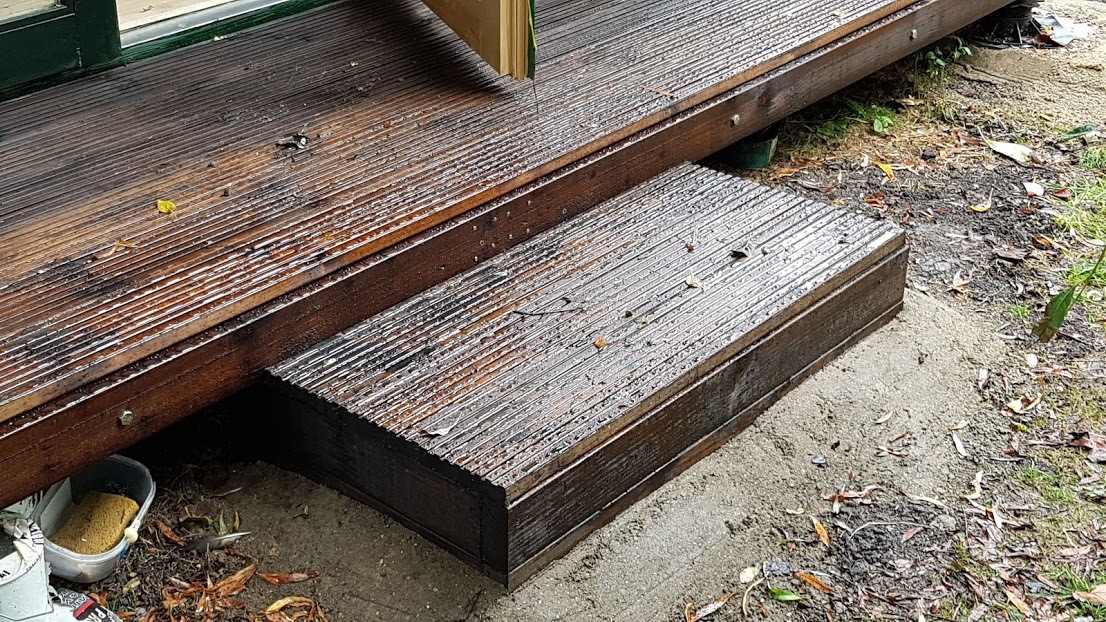 |
| Heres the decking - standard deck boards - after one coat of creocoat. The step is made out of spare 4x2 timbers, with some concrete to hold it in place. The decking creaks slightly, as it's laid along the joists (see discussion earlier). At some point I might add some noggins under the deck to improve this. |
 |
| To ensure there are no drainage issues water is designed to flow under the building (between the ground level and DPM layer, and between the slabs). I've layed some perforated drainage pipes to keep these channels open. |
 |
| I attached this wooden 'tray' to to the back and underside of the desk which hides all the cabling and keeps things tidy. As you can see I'm now using a monitor stand with seperate keyboard and mouse; the USB hub is blu-tacked to the desk making it easy to plug in. |
 |
| Under the desk: I stuck in a few hooks to keep my headsets tidy |
Done
And here is what it's all about... the view from my new desk
 |
Appendix: kit list
There is a fascination on youtube with the kit that people have on their desks for some reason - could be that the influencers are getting the stuff for free. Anyway, here's mine if anyone cares (roughly left to right and bottom to top in the above picture):
- (On the floor): one of several mobile power banks (for lamp / phone / whatever), and a beefier EGOWAY USB C Portable Charger, 27000mAh 100W PD Power Bank External Battery (can run the laptop for several hours if no sunshine for solar)
- Constantly changing set of programming reference books
- Angelpoise 75 mini lamp. USB cable and can run off standard power pack
- Stack of index cards which I use to write bug reports on
- Rubiks cube. Present from my son, don't ask where it came from. About 90 seconds, if you're asking.
- External keyboard. No numeric keypad, nothing fancy, cost about twenty quid
- Lidasen Laptop stand. Basic but does the job
- Laptop. Thinkpad T480 i7 16GB 512GB. Running linux mint. Note, I don't actually use this for trading.
- Webcam: Logitech C920 HD 1080p. Because my laptop webcam isn't that great.
- Anker 4 port USB data hub. This is enough for mouse, keyboard, USB headphones and webcam. If I need to use my Blue Yeti I plug it into the laptops second USB socket
- External mouse. Logitech M90, cost about £8
- Jam jar of pens, rulers and pencils.
- Walkie Talkie. The idea was that I would use this to communicate with the main house, but we tend to send texts or use small children as unpaid couriers. So purely decorative.
- Painted stone, courtesy of my eldest child, and a big wodge of bluetack to stick index cards to bookcase with
- Desk phone. Rarely plugged in.
- Blue Yeti mike. Used for podcasts / webcasts.
- (underneath) Sennheiser PC 8.2 USB headset with mike. My default headset for listening to stuff and quick zoom calls.
- RJ45 headset for desk phone
- 3.5mm headset, for monitoring Blue yeti.
(If any of the above manufacturers want to give me free stuff or money, be my guest)
Very impressive, Rob, I am envious. Well, you have been banging on about need for diversification, and I hadn't quite appreciated to what extent. I guess when the CB's finally blow up the financial markets and we need to protect our families, these skills will prove to be a lot more valuable than building algo systems :). I hope you didn't forget to bury some gold bars under your new office!
ReplyDeleteHa! If you want to know how to build a proper underground bunker, watch this https://www.youtube.com/playlist?list=PLGjbAdaOBLBlS1MPKXYmqwZLZhWC1FAMx
DeleteThank you from your useful information our future need to be stay alive we should save water through water conservation as water is life and conservatuon our future.
ReplyDelete